Tips & Tricks
Turning the Navman S150 into a Bluetooth GPS receiver
Wed, 27/01/2010 - 14:18 — balintNavman GPS receivers, and the like, are great, until you actually want to use their received GPS data on a computer in real-time. Luckily there are plenty of resources to do this (NavmanUnlocked, the forum, MioPocket, GPSPasSion and GPSUnderground). In addition, I recommend SiRFTech for GPS testing. There are many tools available too, such as SSnap, which is extremely useful to track registry and filesystem changes. This is especially good when creating a one-off .reg file that you can import after a hard reset to restore the state of WinCE (in particular Bluetooth pairings).
Here, I give a quick guide to turning a Navman S150 into a Bluetooth GPS receiver that one can use with gpsd on a Bluetooth-enabled computer.
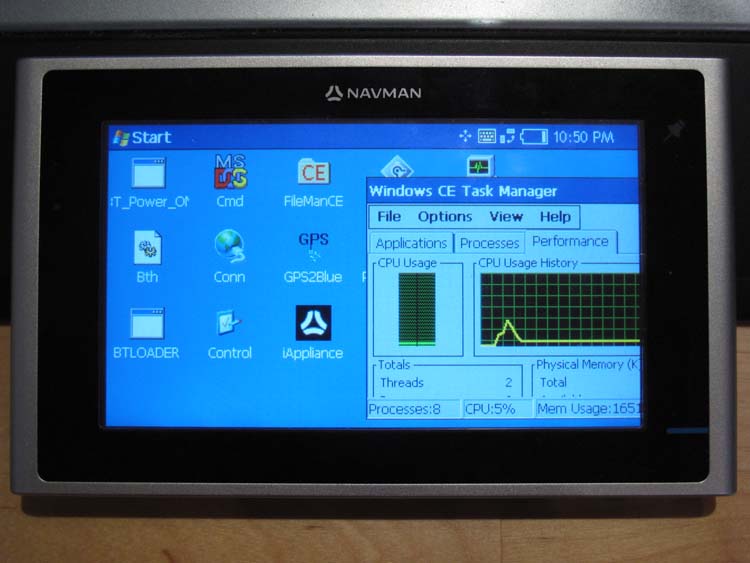
Behold the trusty S150 running WinCE Core 5 and PNADesktop (which is launched from \Program Files\Navman\appstartupsec.ini - the other apps, e.g. SmartST, are manually disabled):
Appendix
Wed, 14/11/2007 - 11:50 — balintThe following lists some examples of programs that could be useful in the recovery of disk data:
Restore the MBR and partition information, therefore restoring the file system
Wed, 14/11/2007 - 11:49 — balintAs the MBR and partition information both resided in track 0, which was wiped when recreated the striped set, we need to first manually restore the partition information and then automatically recover the MBR. The references to sectors in this section only deal with logical sectors as we are now dealing with sectors on the RAID 0 disk.
Re-create the RAID 0 array with the correct settings
Wed, 14/11/2007 - 11:48 — balintThe RAID controller configuration is usually accessible after a successful POST via a keyboard shortcut (such as CTRL+S and/or F4). With the array broken, no RAID set information will be displayed (only the individual disk details). Re-create the RAID 0 set (striped array) using the correct disk ordering and stripe size determined in the previous steps. It is crucial to note this will wipe track 0 on all physical disks! Once the striped set has been recreated, it will appear below the description of the physical disk. For example:
Back up relevant data in track 0 from all drives
Wed, 14/11/2007 - 11:45 — balintThe MBRs and track0s from all RAID array disks should be backed up. Creating a new RAID set in the RAID controller will zero all track 0s. You may also want to write the information down when viewing it a human-readable form.
Determine the stripe size
Wed, 14/11/2007 - 11:18 — balintThe default stripe size for the Silicon Image RAID controller SiL3112 is 16KB (32 sectors) when a RAID 0 array is created in ‘Automatic’ mode. However if the stripe size is guessed incorrectly and the array is recreated, the data will not be contiguous and therefore appear corrupt and inaccessible – writing to the disk will then cause real corruption to the data.
One way to determine the stripe size is to compare the first 100 or so sectors of each disk to a single non-RAID disk with, for example, the sample operating system installed. This will be illustrated with NTFS and Windows XP:
Note: Physical Sector refers to the contiguous sectors on one physical disk. Logical Sector refers to a sector in the RAID 0 array, i.e. contained in the logical RAID disk. Data bytes are written in hexadecimal. An empty sector contains all zeros. I have not read the NTFS specification, so most of the following information I have inferred.
Examining a healthy single-NTFS-partition installation of Windows XP on an individual disk reveals the following information (in physical sectors):
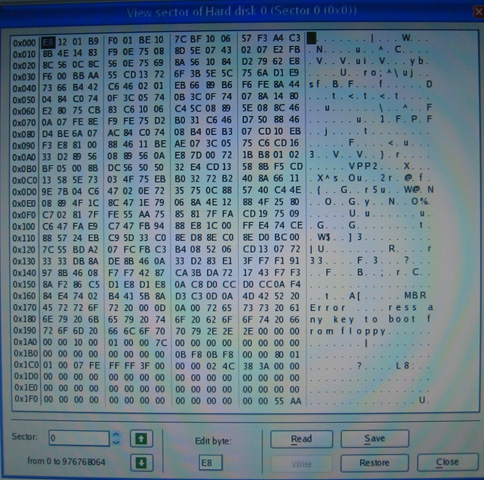
1) The MBR in sector 0 contains one entry describing the extents of the single NTFS partition.
The raw data looks like this:
Determine the order of the physical disks in the array
Wed, 14/11/2007 - 11:01 — balintThe first disk can be identified by an MBR that contains an entry resembling the original extent of the logical RAID disk. For example, if two identically-sized disks were used, then the end-sector of the MBR entry would be approximately twice the number of total sectors on a single disk. The other disks would contain MBRs with odd entries and can be ignored. If it is unclear or all values are nonsensical, the next step will help.
Here is an example of the human-readable values in the MBR from the recovered RAID array:
How to recover a RAID 0 disk array after losing the array’s metadata
Wed, 14/11/2007 - 10:55 — balint(unfortunately this will not help if you lose an entire disk*)
The vast majority of the information presented here I inferred from my own recovery experience – it may be inaccurate or utterly wrong, so use it at your own risk. I do not take any responsibility whatsoever for your data after you apply any of the knowledge described in this document.
RAID 0 (AKA ‘striping’) creates one logical disk out of multiple, identical physical disks. The total capacity is the sum of the individual disks. It offers higher data throughput, but does not actually provide any data redundancy whatsoever. Each disk is proportioned into many identically-sized ‘stripes’, which form a continuous chain when seen from the point of view of the whole logical disk. The stripes are shared in such a way that the first physical disk contains the first stripe, the second physical disk the second, and so on, until we return to the first physical disk where the count continues. The RAID controller stores metadata in track 0 of the physical disk(s) that dictates the configuration of the RAID array. If this metadata is corrupted or lost, the logical RAID 0 disk will be lost, the controller will treat the physical drives as individual, separate logical drives and the data will be inaccessible because it is split over multiple discs. This guide attempts to show how one can recover the logical RAID 0 disk when little information is know about physical & logical disk parameters, and partition & file system information a priori.
Bluetooth PPP connection on Linux
Mon, 30/07/2007 - 15:31 — balintIf you need to establish a PPP connection from a device to your Linux box, then do the following:
- Make sure your Linux installation is set up to support Bluetooth connectivity
- Bluetooth is enabled and compiled into the kernel
- The kernel drivers for your Bluetooth dongle are also compiled and installed
- Bluetooth user-space applications are installed (specifically here we need
dund- the BlueZ Bluetooth dial-up networking daemon)
X Windows
Fri, 27/07/2007 - 17:17 — balint-
Xnest
If you are in an existing X Windows session and would like to open a session on a remote computer that is also running the X server, you can simply use Xnest in the following way:
Xnest :1 -query (remote host)
Windows Side-by-Side Assemblies (WinSxS)
Mon, 07/05/2007 - 14:37 — balintBefore Windows Side-by-Side Assemblies, or WinSxS, (introduced with Windows XP in the Windows\WinSxS directory) the world was plunged into "DLL Hell". That is to say run-time DLLs would all need to be copied into a path (such as System or System32) that is in the global application loader module search path. Commonly people publishing software would also include copies of these DLLs in the local application directory just to be safe, in case the client did not have the necessary runtime already installed, or there was a version mismatch.
Dual monitor Quake III
Thu, 03/05/2007 - 21:51 — balintSee my new four-monitor/quad-head/six LCD set up at uni and at home!
Grab yourself a dual-headed video card and have a real hard time aiming at your opponents!

Popular content
Today's:
- About
- Update
- Turning the Navman S150 into a Bluetooth GPS receiver
- Patch for Linux Kernel Orinoco WiFi driver re-enabling original monitor mode with Prism II headers & packet power levels
- Simplified Makefile System
- Restore the MBR and partition information, therefore restoring the file system
- Windows Side-by-Side Assemblies (WinSxS)
- NISRP: the Non-Intrusive Song Rating Plugin for Winamp and iTunes
- My Bicycle
- WiFi Adventures
All time:
- About
- How to recover a RAID 0 disk array after losing the array’s metadata
- Making your iPhone look like a NMEA GPS receiver with gpsd and WiFi or Bluetooth
- Aircraft Tracking with Mode S: Modez & Aviation Mapper
- Australian Geographical RadioFrequency Map
- Windows Side-by-Side Assemblies (WinSxS)
- Dual monitor Quake III
- Determine the order of the physical disks in the array
- Update
- Tearable Cloth
AntiSpam spam counter
