Re-create the RAID 0 array with the correct settings
Wed, 14/11/2007 - 11:48 — balint
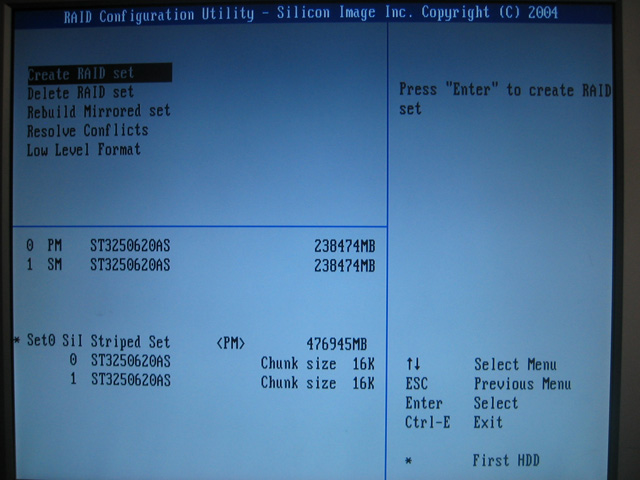
The RAID controller configuration is usually accessible after a successful POST via a keyboard shortcut (such as CTRL+S and/or F4). With the array broken, no RAID set information will be displayed (only the individual disk details). Re-create the RAID 0 set (striped array) using the correct disk ordering and stripe size determined in the previous steps. It is crucial to note this will wipe track 0 on all physical disks! Once the striped set has been recreated, it will appear below the description of the physical disk. For example:
All content copyright © Balint Seeber 1999-2026. All rights reserved.


Popular content
Today's:
- About
- Update
- Turning the Navman S150 into a Bluetooth GPS receiver
- Simplified Makefile System
- Making your iPhone look like a NMEA GPS receiver with gpsd and WiFi or Bluetooth
- Patch for Linux Kernel Orinoco WiFi driver re-enabling original monitor mode with Prism II headers & packet power levels
- Australian Geographical RadioFrequency Map
- Restore the MBR and partition information, therefore restoring the file system
- My Bicycle
- AusAir
All time:
- About
- How to recover a RAID 0 disk array after losing the array’s metadata
- Making your iPhone look like a NMEA GPS receiver with gpsd and WiFi or Bluetooth
- Aircraft Tracking with Mode S: Modez & Aviation Mapper
- Australian Geographical RadioFrequency Map
- Windows Side-by-Side Assemblies (WinSxS)
- Dual monitor Quake III
- Determine the order of the physical disks in the array
- Update
- Tearable Cloth
AntiSpam spam counter

Comments
Incredibly useful guide!!
Thank you. This was a life saver. I had a raid0 drive driven of the motherboard SATA, and my motherboard died. I replaced the MB with a new one - different model of course, but I needed to re-acquire the meta-data. After using your instructions to figure out the order and stripe size,and saving all the track zeros, I tried it out on the some other disks, I found that when I configured the RAID0 using my new MB BIOS it offered me the option "Clear the MBR?". I said NO. This let me create two good disks as a RAID0, and then uncreate them without losing any data (obviously I didn't format the RAID0). However before you get to the "Clear the MBR?" question you have to say YES to "This may delete all the data" and you probably don't notice that it says "may" not "will".
So I recreated my RAID0 just by defining it to the BIOS in the RIGHT ORDER and with the RIGHT STRIPE size (as determined using your guide), and with "Clear the MBR?"NO.
My MB is a ASUS M4N78 PRO using NIVIA GeForce chipset and RAID BIOS. I have used many RAID config tools that DO NOT have the "Clear the MBR?" option, They just do it. But if you are lucky, yours might!
hello
very cool realy thanks....evden eve nakliyat