Turning the Navman S150 into a Bluetooth GPS receiver
Navman GPS receivers, and the like, are great, until you actually want to use their received GPS data on a computer in real-time. Luckily there are plenty of resources to do this (NavmanUnlocked, the forum, MioPocket, GPSPasSion and GPSUnderground). In addition, I recommend SiRFTech for GPS testing. There are many tools available too, such as SSnap, which is extremely useful to track registry and filesystem changes. This is especially good when creating a one-off .reg file that you can import after a hard reset to restore the state of WinCE (in particular Bluetooth pairings).
Here, I give a quick guide to turning a Navman S150 into a Bluetooth GPS receiver that one can use with gpsd on a Bluetooth-enabled computer.
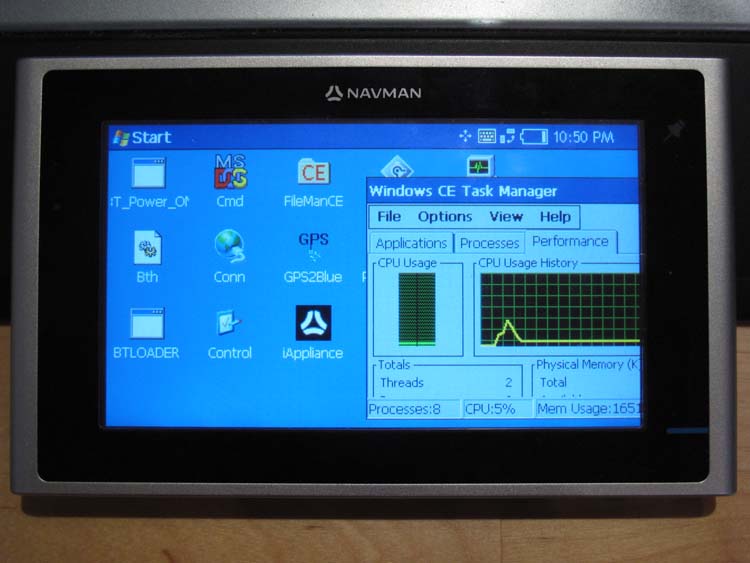
Behold the trusty S150 running WinCE Core 5 and PNADesktop (which is launched from \Program Files\Navman\appstartupsec.ini - the other apps, e.g. SmartST, are manually disabled):
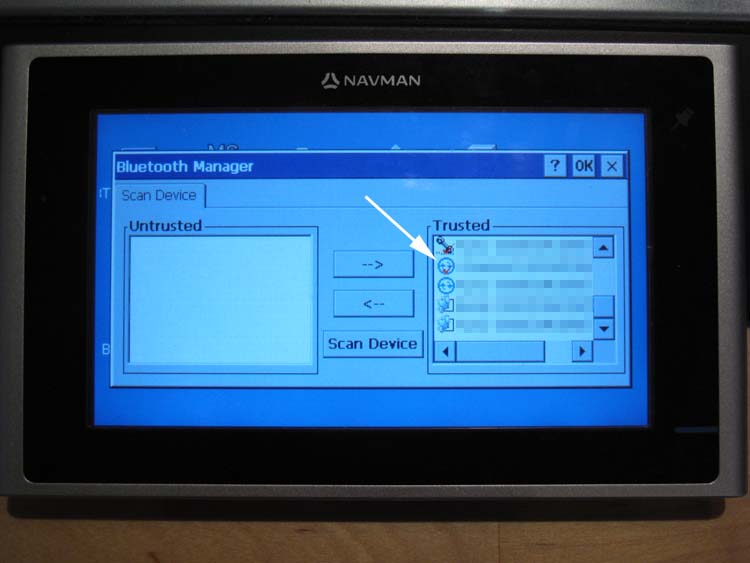
First one needs to pair the Navman with the computer and set up an RFCOMM channel for serial communication. On the S150 the CSR Bluetooth chip is powered off by default. Prior to doing anythign Bluetooth, you must run BTLOADER and BT_POWER_ON (the latter sometimes a few times) to enable the chip. Those two programs can be found in the big MioPocket ZIP file. Otherwise you'll see "Bluetooth Hardware Error 10050 (controller not present)". Next, perform a scan and look for the Bluetooth serial connection profile pointed to with the arrow below (it must be this icon, which actually stands for ActiveSync but is a serial connection underneath). A note for the Microsoft Bluetooth stack: an incoming serial connection will only be advertised if the port is open! Therefore you should actually set up the PPP server first (instructions follow, or open the port using HyperTerminal). Once you have found the device, add it and authenticate (i.e. pair it to the computer). The final important step is that the port must be activated in WinCE. Once the device is in the 'Trusted' list, bring up the context menu for that device and make sure the 'Active' item is checked. This will result in the red tick on the device icon seen below, and you will now see this connection appear as an option in the properties for direct connections in the Connections control panel applet.
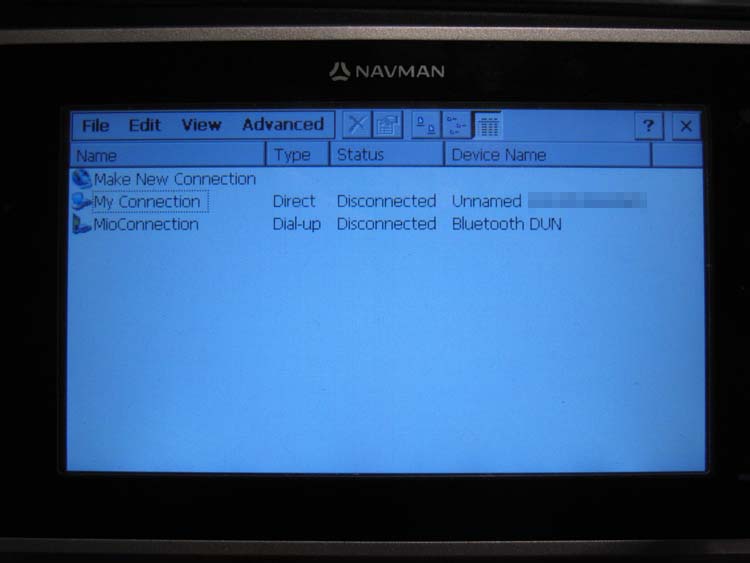
Next, one needs to create a new Dialup Neworking connection so WinCE can connect to a PPP server. Make sure you select the new Bluetooth serial connection that was created above:
The easiest PPP server solution on the target computer is to set up 'Incoming Connections' on Windows 2000, XP or Vista in the Network Connections Control Panel. In summary:
- Creating an incoming serial COM port using the Bluetooth applet.
- In the Modems control panel applet, manually add the 'modem': "Communications cable between two computers", which is effectively a software null modem, and assign it to the new Bluetooth COM port.
- Use the Network Connections wizard to create a new Incoming Connections interface and check the new null modem connection. Whether in the wizard, or after its completion in the connection's properties, make sure you allow directly connected devices to connect without authentication, make sure TCP/IP is enabled, and you manually assign an IP range to be used. This can be anything, but bear in mind that the first IP address in the range will belong to the PPP server. I have found that using an existing DHCP server on one's network to hand out address for this Incoming Connection is problematic and should be avoided (e.g. client devices will not connect to other devices on the network - something bad happens with the server's routing).
That's all there is to it! The Bluetooth COM port will be exclusively in use by the PPP server, unless you uncheck the box for the null modem connection in the 'Incoming Connections' properties.
Finally, once connected to the computer, run GPS2Blue, specify the destination IP address and hit 'On':
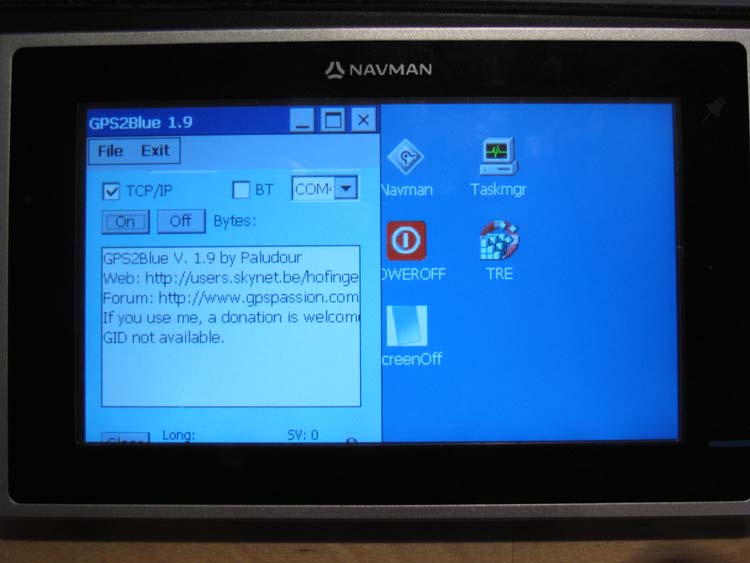
I set the destination port of GPS2Blue to the listener port of the HW VSP (Virtual Serial Port) server. HW VSP usually runs in normal 'client' mode instead (i.e. connecting to a virtual COM port causes it to create an outbound TCP connection), so it is crucial to instruct the server to run in 'listen' mode where it will wait for inbound TCP connections - COM port connections can be made at will during this state. Once a particular virtual COM port is chosen, gpsd should be told to connect to this port to receive NMEA sentences.
Important: make sure that gpsd connects to the VSP at a high baud rate (e.g. 115200), otherwise incoming data will buffer up at the VSP since the COM port becomes a bottleneck at low rates (e.g. 1200). If you forget about this, you'll be left wondering why your GPS position is lagging so much behind where you really are! COM ports preserve their settings from last use, so the easiest way to ensure that a high baud rate is chosen is to manually connect to the VSP using HyperTerminal - when creating the connection, specify a high baud rate. This should automatically be picked up by gpsd when it is run next using the same COM port.
The alternative is to set up a dedicated RFCOMM channel for GPS serial data and use the 'BT' option in GPS2Blue, however there is no free off-the-shelf WinCE program to create the COM mapping. I wrote a very simple test hack program to do this, and it works (but it's too much of a hack at the moment to put up here). A source code example is available at MSDN, and it should be noted that although the mapping is creating in one application, the new Bluetooth COM port can be accessed in any other application (i.e. GPS2Blue) until the registering application destroys the mapping.
Popular content
Today's:
- About
- Blue Milk
- Simplified Makefile System
- Update
- Turning the Navman S150 into a Bluetooth GPS receiver
- Chroma key fun
- My Bicycle
- Making your iPhone look like a NMEA GPS receiver with gpsd and WiFi or Bluetooth
- Restore the MBR and partition information, therefore restoring the file system
- The Early Days
All time:
- About
- How to recover a RAID 0 disk array after losing the array’s metadata
- Making your iPhone look like a NMEA GPS receiver with gpsd and WiFi or Bluetooth
- Aircraft Tracking with Mode S: Modez & Aviation Mapper
- Australian Geographical RadioFrequency Map
- Windows Side-by-Side Assemblies (WinSxS)
- Dual monitor Quake III
- Determine the order of the physical disks in the array
- Tearable Cloth
- Update
AntiSpam spam counter
