Australian Geographical RadioFrequency Map
RFMap featured in GQ Australia (April/May 2012)!

You can also have a listen to this podcast of a radio interview I did on with Ian Woolf on 2SER:
"Balint Seeber Mashed Up Radio"
UPDATE: I have written an extensive guide with plenty of screenshots explaining how to use the map to the full. The contents of the guide can be found to the left of this text (at the top of this page's left-hand column). Read it if you wish, or dive right in. Alternatively, open two tabs/windows and go through the guide while trying it out live.
The Australian Geographical Radio Frequency Map is a site that overlays all registered RF transmitters on top of Google Maps. Generic antenna sites are shown with the red RF icon, while mobile base stations are represented by the carrier that operates from the site (often multiple carriers do, but currently the first is chosen when determining the icon). A mouse-over will give you the site's description, and a click will tell you who broadcasts from there, and at what frequencies. Much more is to come...
Although people by-and-large won't be terribly interested in the positions of every antenna in the country, they might be interested in checking how close they are to their nearest mobile base station, how good a carrier's coverage is in a particular area, and for prospective spectrum purchasers to assess possible interference, etc. However, having said all that, it is primarily in the ham spirit.
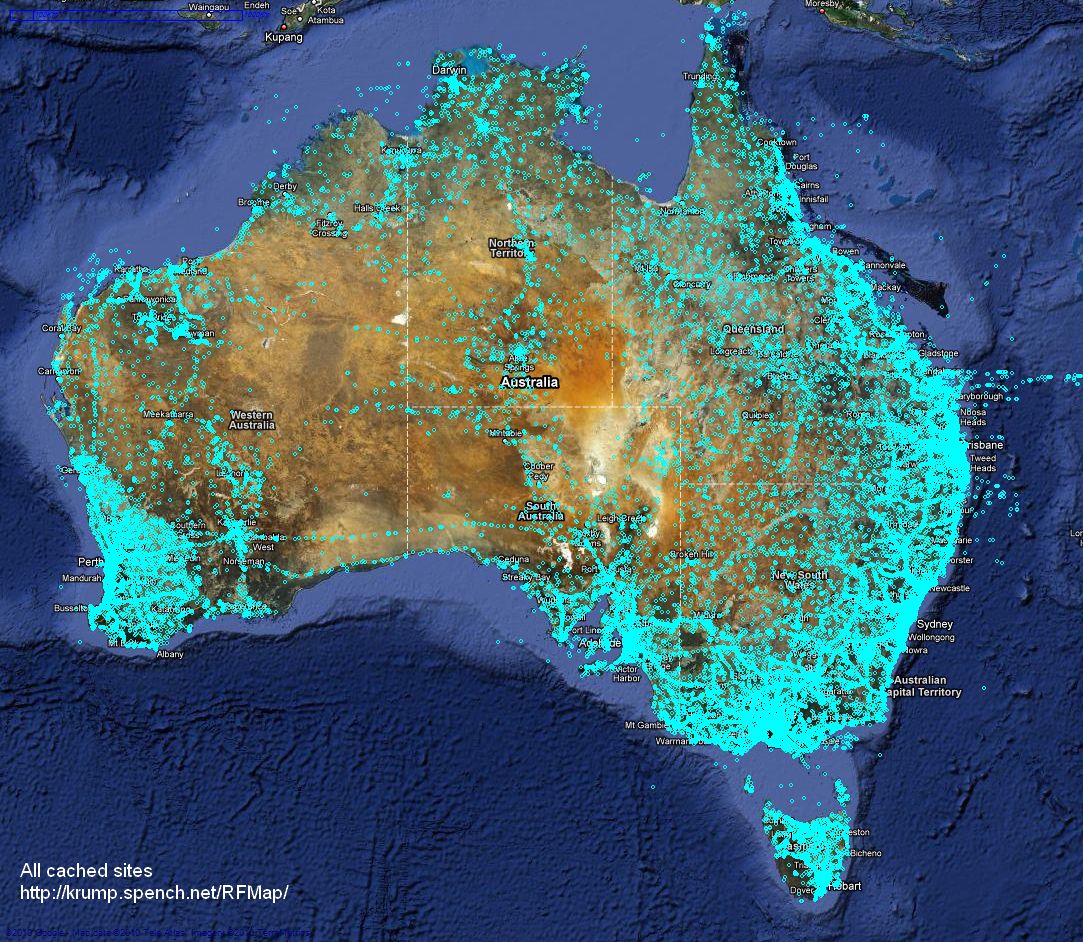
Here is every transmitter site cached in the database, which is fully searchable from the web interface (shown below) by location, site name, client details, frequency range, emission designator and callsign:
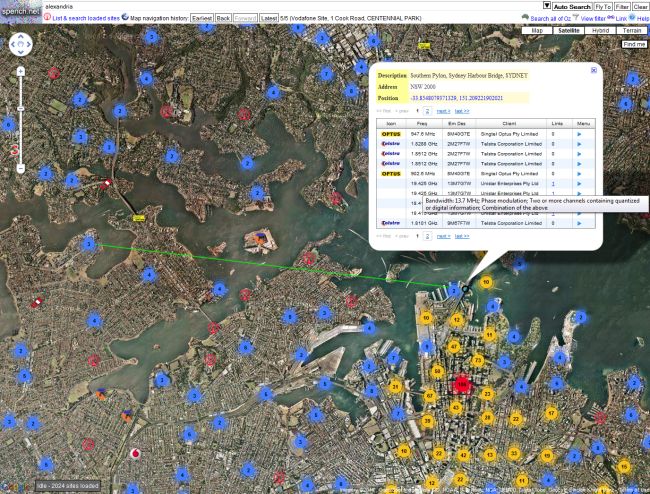
Here is a browser preview:
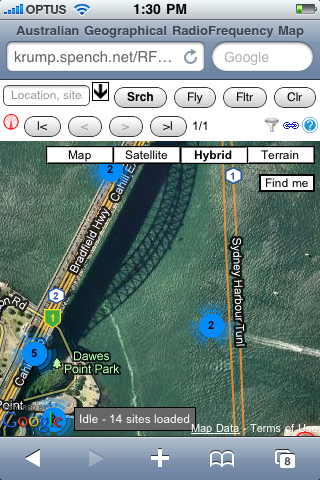
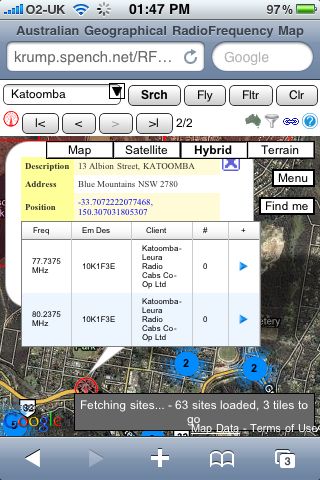
Here is what it looks like on the iPhone:
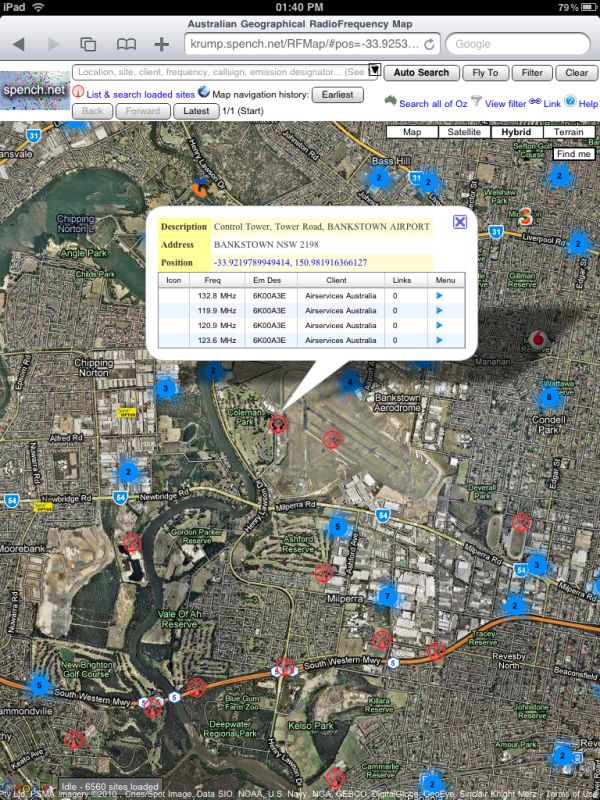
And on the iPad:
Starting off
When you first visit the site, you will see the whole of Australia. You'll also notice some once-only information pop-ups, as well as a tooltip that follows your mouse around the map. Please keep the mouse still and read the contents of the tooltip - it will disappear after you read it!
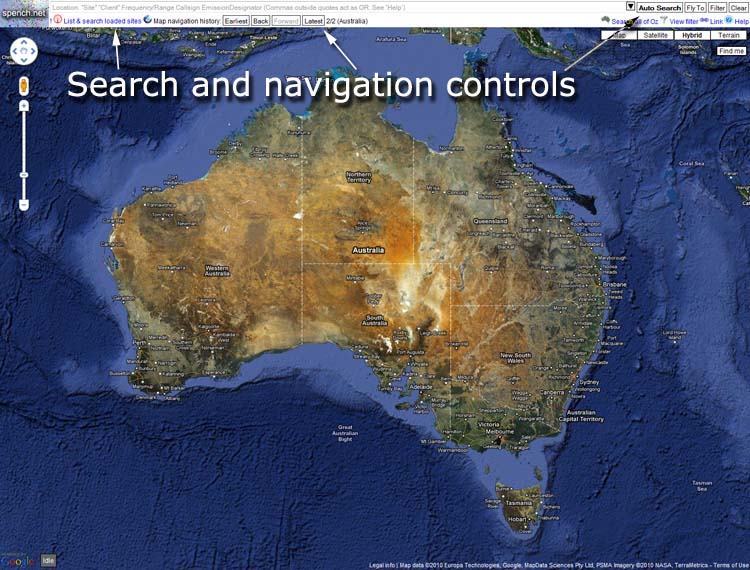
The map works just like a normal Google Maps page: you can pan and zoom. If you pan around or jump to a specific location (covered later), the previous map view is stored in the 'Map Navigation History' (like your 'previous/next' browser history). Simply click 'Earlier', 'Back', 'Next' or 'Latest' to jump through you navigation history. If you are at an earlier point in the history and move the map or navigate somewhere else, all future points in the history will be erased (just like what happens in your web browser).
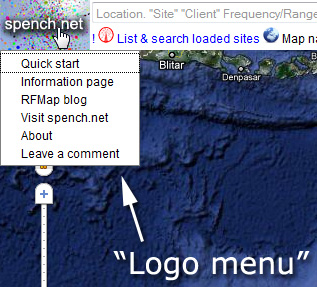
The 'spench.net' logo is actually a menu. You'll find some handy links inside:
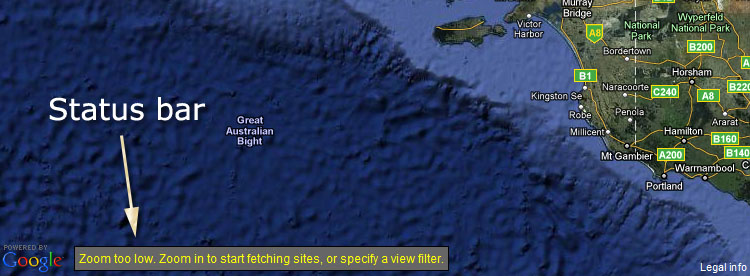
Please pay attention to the status bar. It will inform you of what RFMap is doing, how many sites are loaded, what filters are active, and various other stats.
AN IMPORTANT NOTE: If you zoom in and navigate to a high-density area without filtering, up to 5000 sites will be returned. If you do not have a fast computer with a good web browser (fast Javascript VM and good memory management), RFMap will use up no small amount of CPU time and RAM. If the web page becomes unresponsive and you see a dialog asking whether you want to terminate the current script, this is (currently) expected behaviour! You can terminate it if you wish, but if you wait for an extra moment, the markers will be drawn. You can also clear the data by right-clicking on the map and selecting 'Clear sites'. The suggested approach is to specify your filter before navigating to such areas, or typing the location into the search bar and going straight there, instead of zooming down through the levels individually. If you zoom in, you can also right click and select 'Cull invisible sites' to remove the markers you cannot see at the upper zoom level. This will all be made more straightforward in a future release.
Search overlay
The search overlay is a multi-faceted tool to help you search RFMap. To open it, click in the search text input box, or on the small arrow button to the right of the text box. Clicking on the the button again, or pressing ESC, will close it, although performing an action (such as clicking a link or pressing ENTER having typed something into the search text input box) will close it automatically.
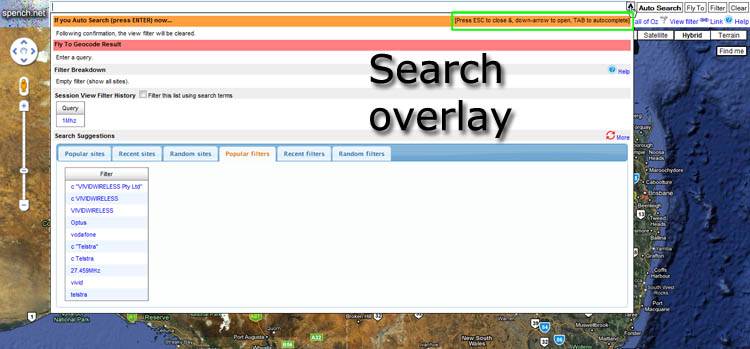
If you just want to explore, pick something from the various categories of suggestions. You can choose from either sites or filters, and each is categorised by overall popularity, what has just been viewed or pulled out of a hat. Clicking the 'More' link will show some more options if you don't like the look of any in the current list.

If you're after something specific, then you can type it in the search text input box. As you start typing, suggestions will automatically appear based on the current word you're finishing, the previous word, possible next words and complete phrases. To pick any suggestion, either click it with the mouse or use the up/down arrows to move the selection highlight over your choice and hit ENTER. If you want the suggestions to disappear because you want to click on a geocode result, or see the filter breakdown, hit ESC. If you want to bring it back up, press the down arrow. If you go back to an existing word while the suggestions are hidden and want to auto-complete that word, place the cursor anywhere inside the word and hit TAB to show auto-complete suggestions for that word and those around it.
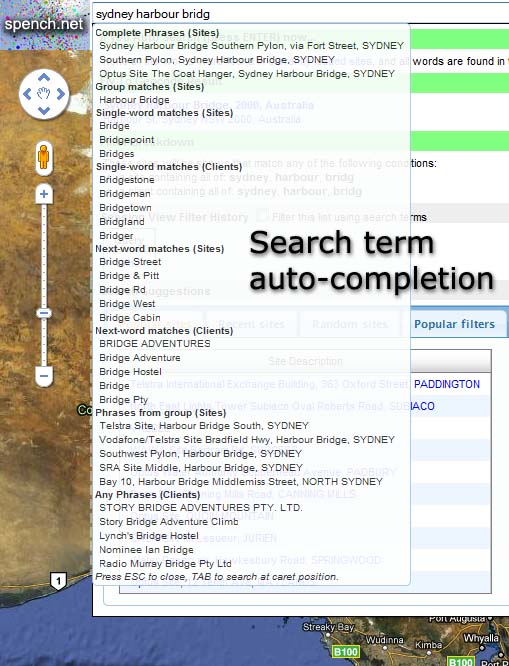
If you type in a place name, it should be recognised as such. Press ESC to hide the auto-complete suggestions - you will then see what RFMap thinks of your search terms. The first section will describe what it will do if you press ENTER now (same as clicking 'Auto Search') - it depends on whether your terms are recognised as a place and whether the terms are found in sites that are currently loaded. If you don't want the automatic action to take place, click on either 'Fly To' or 'Filter' (next to 'Auto Search') to manually fly to the place, or apply the filter you have entered.
In this case the search input is an incomplete 'sydney hardbour bridg', which has been recognised as a place, so one can either press ENTER to fly there, click 'Fly To', or click either geocode result link in the second part of the overlay. If 'Filter' was clicked, the filter described in the third section would be applied to the current view.

After pressing ENTER, the map jumps to the beautiful Coat Hanger. If it happens that we wanted to filter using the search terms instead (and the map has just flown somewhere), simply click on the link inside the orange pop-up, and the previous map view will be restored and the filter applied to it.

Site marker clustering
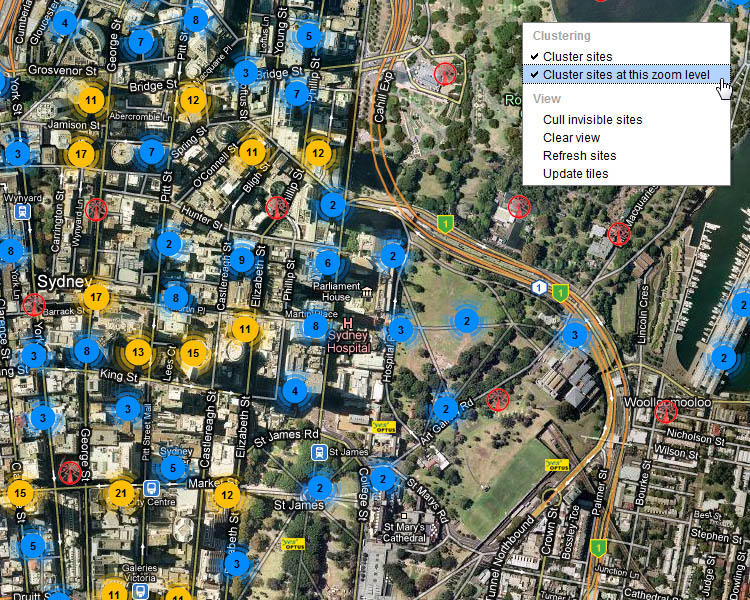
Site marker clustering is enabled by default at all but the lowest zoom levels. This is so the map doesn't becomes too cluttered (it also improves drawing time). If you wish, you can disable clustering the the current zoom level (and therefore all levels 'closer' to the ground), or switch it off altogether. This is especially handy when looking at sparse RF regions. Simply right click on the map to open the context menu.
Here is clustering enabled:
And clustering off (at this zoom level, and all below it):

Site list
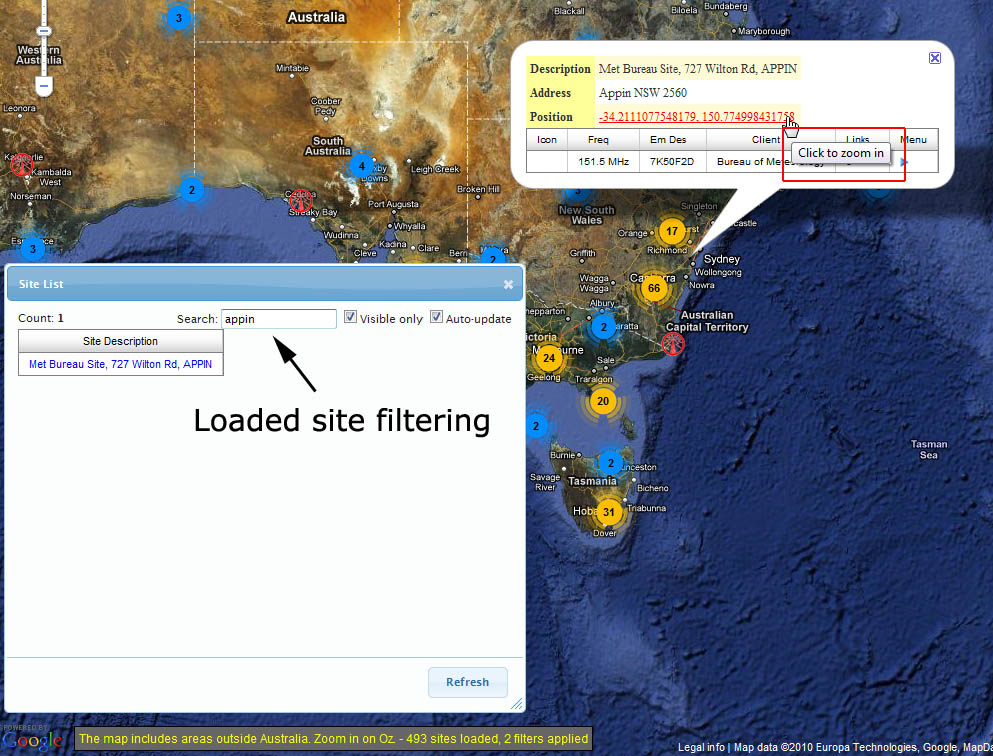
Having been shown where RF sites are, one can click on the 'List & search loaded sites' link in the search & navigation bar. This will display a modeless dialog that contains a list of all loaded sites. If any site link in the list is clicked, the map will move to that site and display its information window. To search within this list, simply type into the text box. The 'Visible only' check box will only show markers currently visible on the map in the site list. Switching this off will show all loaded sites (those visible, and those off-screen that you would have seen previous, for example before panning to the current view). The 'Auto-update' tells the dialog whether it should automatically update the list if you move the map (particularly handy if you only want to see visible sites).
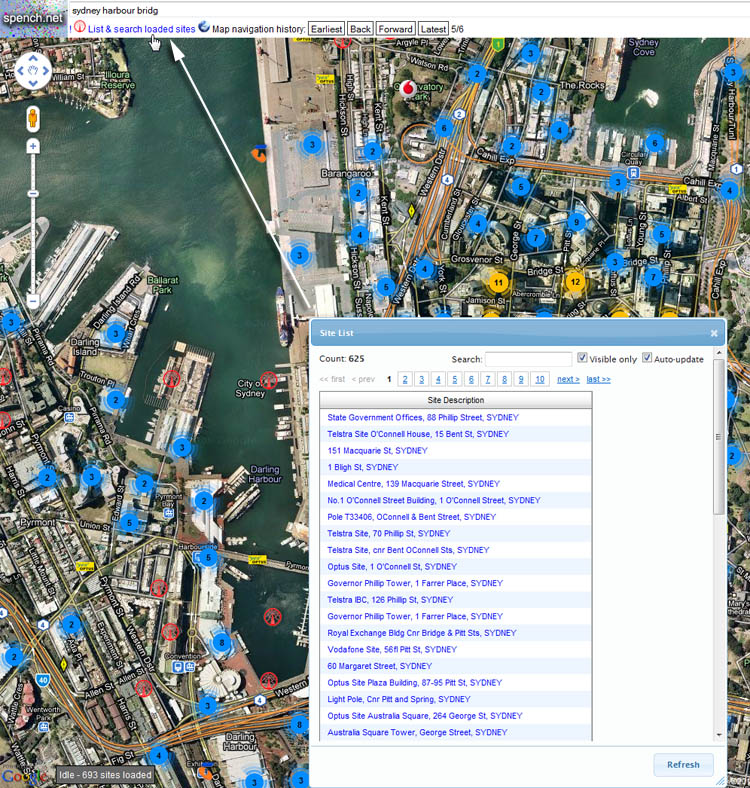
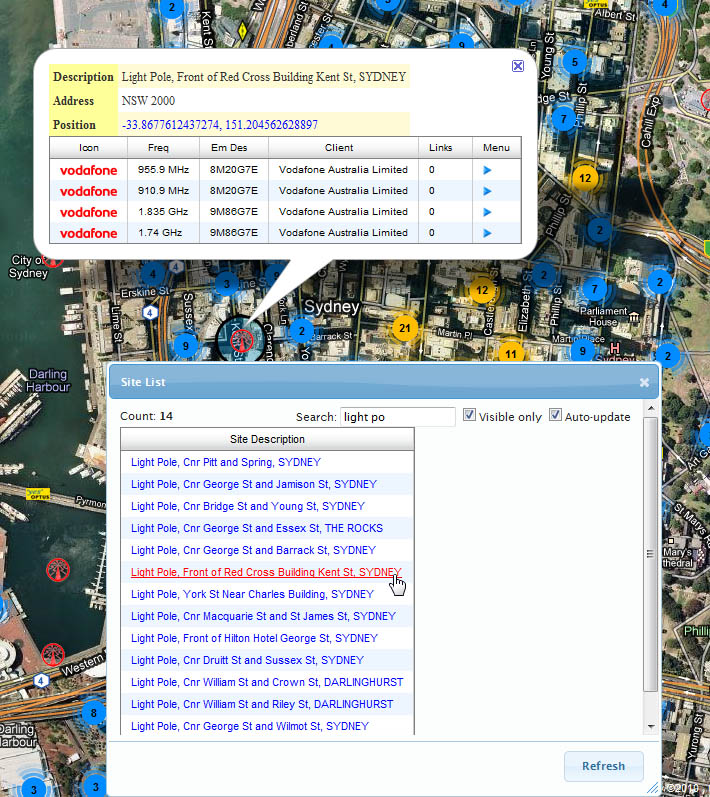
Typing into the text box will only display matching sites in the current list. For example: a huge number of sites in the CBD is narrowed down to those on a light pole. Clicking a match pops open the site information and highlights the site:
View filters
View filters are used to constrain the data sent to your web browser. They can be constructed in one of two ways: typing them into the search term input box, or clicking the 'View filter' button to create conditions manually. The syntax of the filter parser is quite sophisticated, so you should rarely need to use the view filter editing dialog. The syntax for expressing advanced view filters is found by clicking 'Help' in the top-right of the window. In summary, you can search by any combination of:
- Site name & client details (words and phrases depending on quote/double quote usage)
- Frequency (one or a range, accepts kHz/MHz/GHz units - default is Hz, numbers > 1000 automatically treated as frequencies)
- Callsign (all Australian callsigns are automatically detected)
- Emission designator (wildcards are supported)
Multiple queries (i.e. OR) can be submitted at once depending on comma usage. A copy of the complete tips is at the bottom of this page (although it is recommended you check the 'Help' dialog in RFMap as it will be updated first if anything changes).
If a term is not parsed automatically, hints can be explicitly given prior to the term: 's' for site, 'c' for client, 'e' for emission designator and 'v' for callsign. Make sure you analyse the 'filter breakdown' as this will tell you exactly how RFMap will treat your query.
If you want to specify a place and a filter in the one query, type in the place name, followed by a full stop '.', and then the view filter.
View filters are cleared by clicking 'Clear' (above 'Help'), which will be coloured red if any view filters are active (the number of active filters is shown in the status bar).
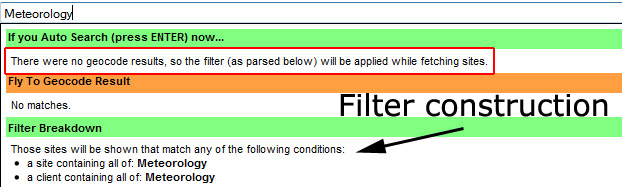
Here, for example, typing 'Meteorology' yields no geocode results (that section is orange to indicate this). It will therefore be used to construct a view filter in the manner detailed in the 'Filter Breakdown' section. General words (without search hints) are used to search both site names and (really simultaneous OR) client details.
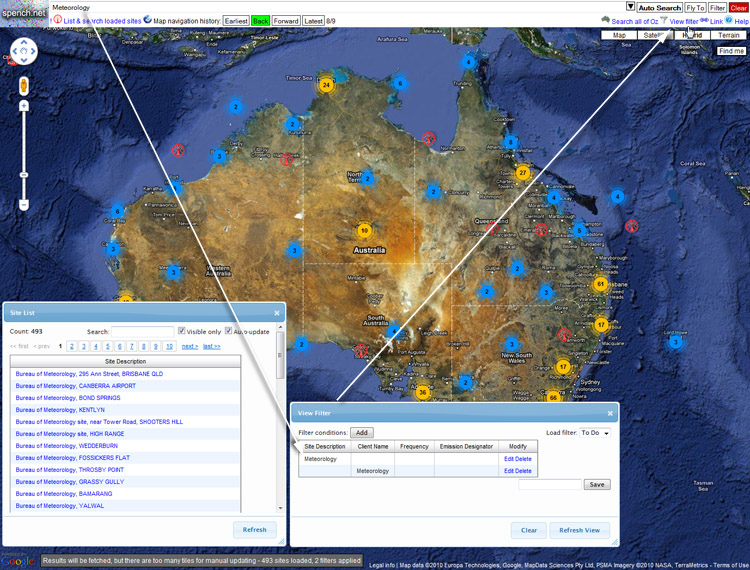
ENTER is pressed after typing the text above. This shows the following sites on the map. After clicking on the 'View filter' button, the view filter dialog opens with the two filters inside. One can add new filters, edit existing ones or delete them. Adding/editing filters opens a model dialog that lets you set the specific items of each filter.
Once a site information popup is open, you can click on the position link to have the map zoom in to that one site (instead of you having to do it manually).
Site information
The site information window contains details about each assignment, some of which aren't shown directly. Each assignment also has a menu that offers various extra actions (some of which are not implemented at this stage).
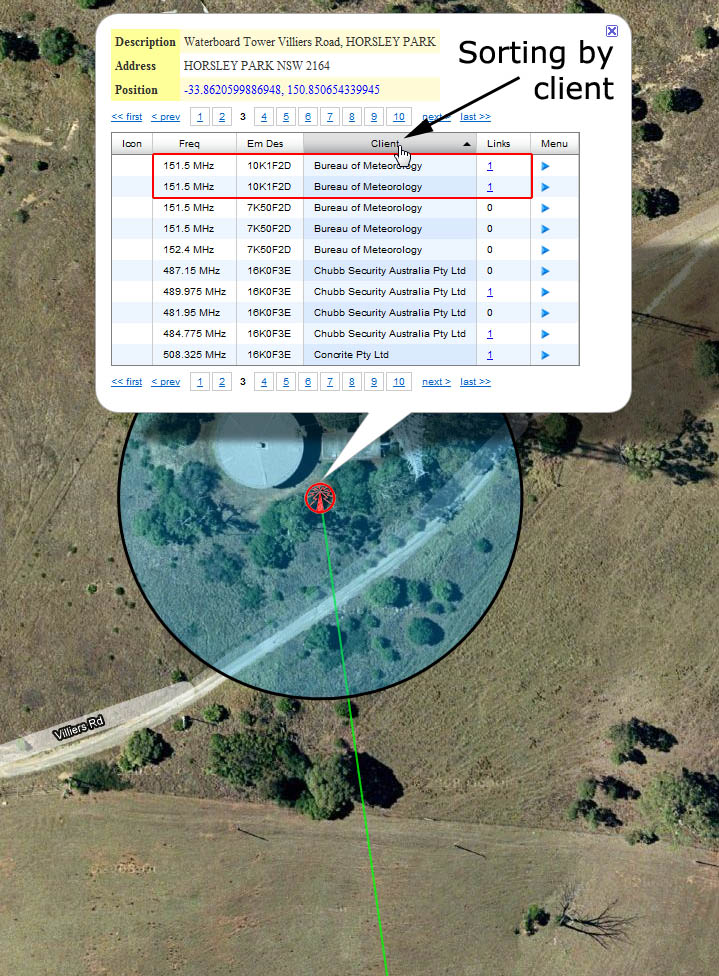
Each column containing assignment details can be clicked to apply forward/reverse sorting of that field.
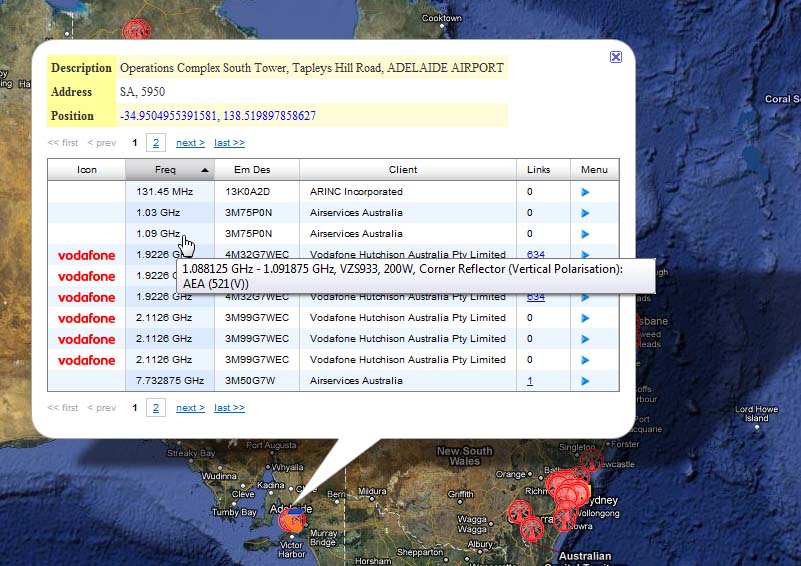
Hovering over the frequency, emission designator and client will reveal further information about that assignment. The following three examples use the results returned by typing '1.03GHz' into the search term input box. This is automatically translated into a view filter that will return all sites containing assignments with 1.03GHz inside their frequency ranges (this happens to be the uplink frequency of the Mode S aviation transponder system).
For frequency, it will tell you the assigned frequency range, callsign, transmitter power, and antenna model, type and manufacturer:
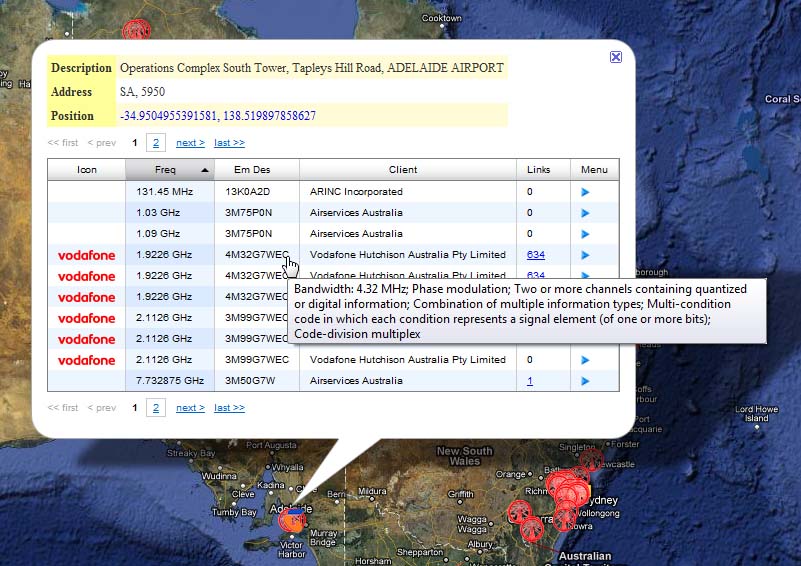
For emission designator, it will give you a human-readable description of each of the components of the designator. A UMTS-TDD (? not in 1900 PCS range - comments anyone?) assignment's emission designator is shown here since it contains lots of information:
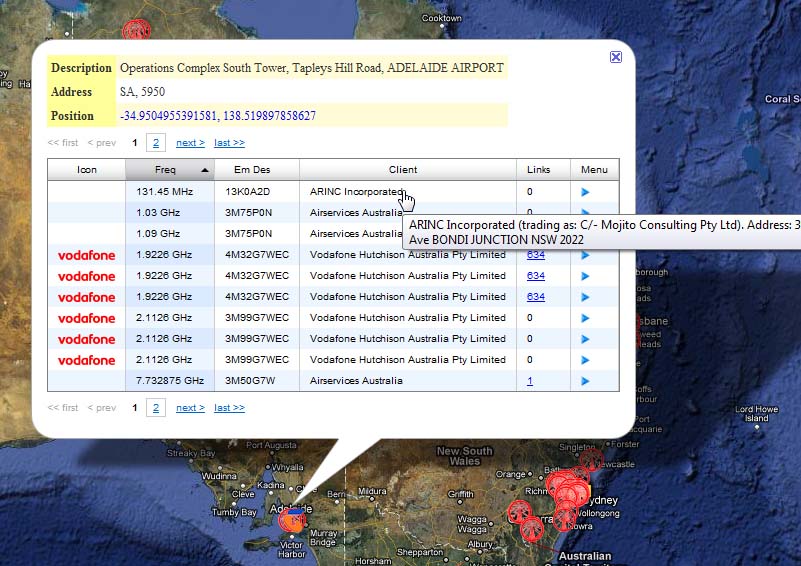
For client, it will display the contact details and address:
One can click on the blue arrow to open that assignment's menu:
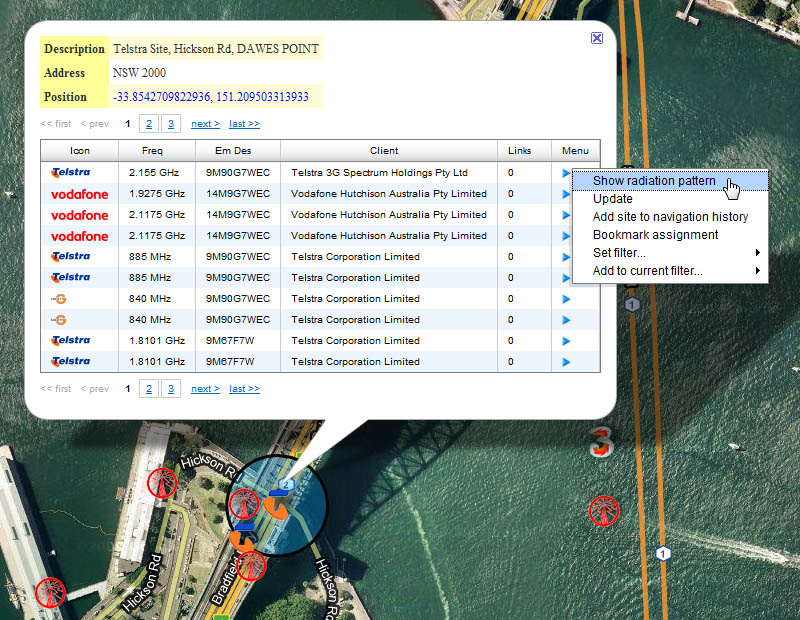
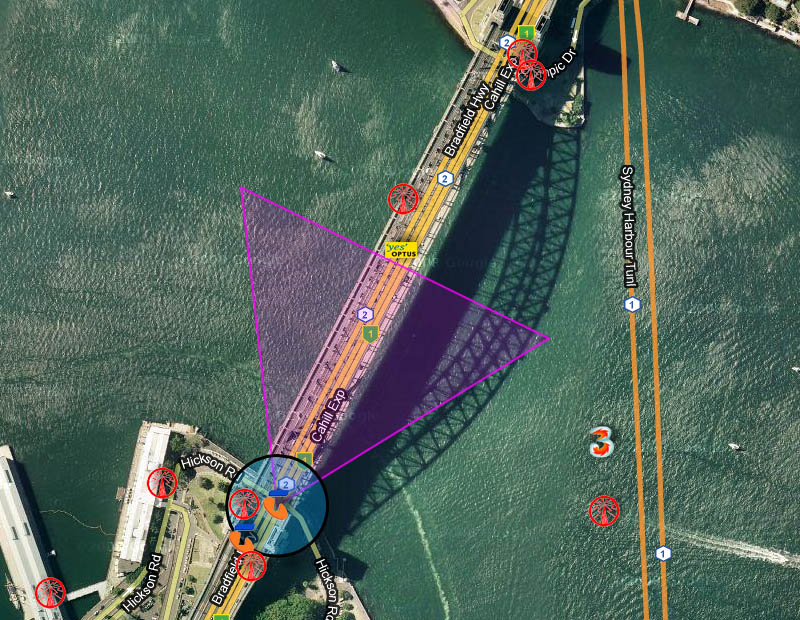
One interesting feature is showing the radiation pattern. This uses information, such as the antenna type (omni or directional beamwidth), antenna gain and transmitter power, to draw an idealised free-space radiation zone out to 1mW. PLEASE NOTE: this is not in any way accurate (it does not take into account antenna height AGL, terrain or obstructions) and should not be used for anything more than to see which way the antenna is pointing and how strong a transmitted signal is in free space relative to other transmitters.
Site links
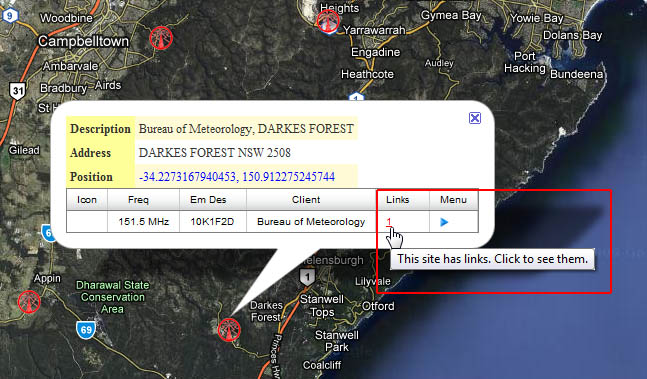
Certain sites contain assignments that are linked to other assignments at remote sites (e.g. point-to-point microwave links, or wide-area simulcast). This is indicated by the 'Links' column in the site information window:
Clicking the number will draw the links on the map with green lines. Clicking one of the green lines (outside the site highlight circle, if it is even shown - it is not in the above image), will cause the map to fly to the remote site and that site's information window will open.
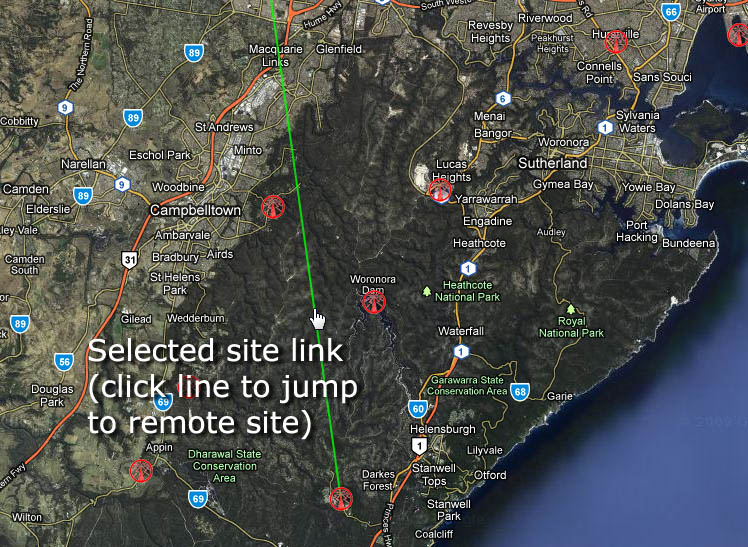
After clicking on the original link line, the remote site is shown. Clicking on its new link line would jump back to the original site.
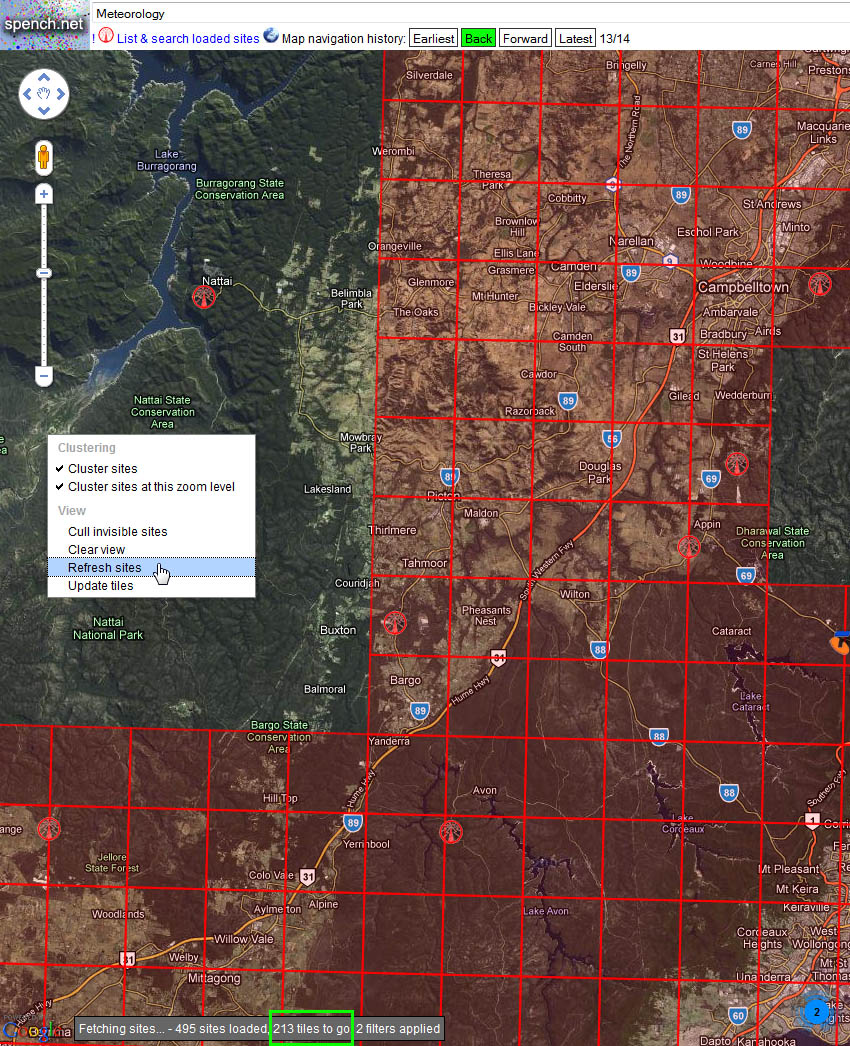
Fetching the latest data
To ensure the data you are searching is up-to-date, right click on the map and select 'Update tiles'. This will refresh all sites contained within the area of the current map view. Red tiles will indicate those areas which are waiting to be updated, and will disappear when they have been updated. Moving the map (even a touch) will cancel the update. Progress can be seen in the status bar.